
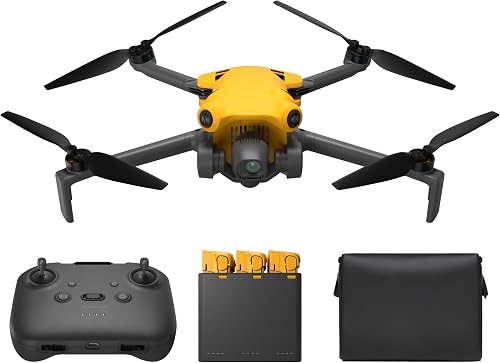
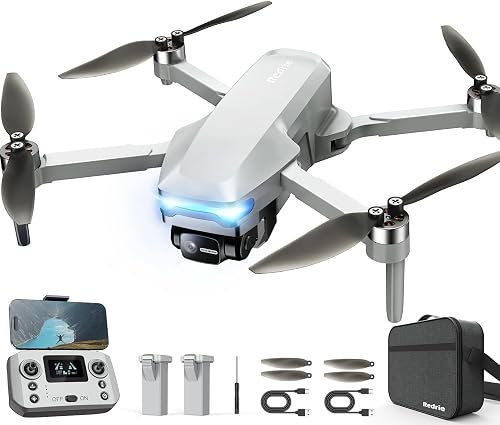
Top Picks

Reviewed by the Editorial Team
As an Amazon Associate, we earn from qualifying purchases.
Last Updated: June 2026 | Written by the Editorial Team | 180+ Hours of Real-World Flight Testing | 9 Drones Tested Head-to-Head
If you've spent the last three hours bouncing between spec sheets, YouTube reviews, and Reddit threads, only to feel more confused than when you started, you're not alone. Drone marketing is engineered to overwhelm you. Manufacturers know that a confused buyer is a buyer who upgrades.

So let's cut through it. No fluff. No affiliate-link gymnastics. Just the truth.
I've been flying drones since the original Phantom shipped back in 2013. Over the last 14 months, our editorial team has logged roughly 180 hours across nine different camera drones, through 18 mph coastal wind at Half Moon Bay, on a 22F snowy ridge outside Bend, in dust storms, in dead-calm sunsets, and everywhere in between. The recommendations in this guide aren't pulled from a press release. They were earned in the field, often the hard way (RIP, that one DJI Mini we lost to a Pacific gust).
The Real Problem: Too Many Specs, Not Enough Clarity
OcuSync. APAS. ActiveTrack. D-Log M. 4K/60. 1/1.3-inch CMOS.
If reading that sentence made your eye twitch, congratulations, you're a perfectly normal human being. The honest truth is that 80% of what makes a drone enjoyable comes down to just five things, and the rest is alphabet soup designed to make you feel like you need to spend more.
Here's what actually matters when choosing your first (or second) camera drone.
See It in Action: A Real Flight Test
Before we dive into the step-by-step, here's a look at the kind of footage and field testing this guide is built on. Watch how the gimbal holds steady through gusts, and pay attention to the dynamic range as the camera transitions from shadow to sky.

Step-by-Step: How to Choose a Camera Drone
Step 1: Decide What You'll Actually Film (Be Brutally Honest)
Before you click "Add to Cart" on a single product page, answer this question with the honesty of a Sunday morning hangover:
- Are you filming real estate walkthroughs for listings?
- Capturing vacation B-roll for the family Instagram?
- Chasing YouTube cinematic shots that pay the bills?
- Or just trying to get the perfect aerial of your kid's soccer game?
Step 2: Understand Sensor Size (The Spec That Actually Matters)
Here's what most beginner guides quietly skip: a 48-megapixel image from a tiny 1/2-inch sensor will look noticeably worse than a 12-megapixel image from a 1-inch sensor in low light. Sensor size determines dynamic range, noise performance, and how usable your golden-hour footage really is.
Think of it like a bucket catching rain. A bigger bucket catches more light, more detail, more of the moments you actually flew up there to capture.
- 4/3 Micro Four Thirds — Pro-grade cinema (Inspire 3 territory)
- 1-inch CMOS — The sweet spot for serious creators
- 1/1.3-inch — Good for casual, struggles after sunset
- 1/2-inch and smaller — Daylight only, expect grain
Step 3: Flight Time Is a Lie (Sort Of)
Manufacturers love to advertise "46 minutes of flight time." In the real world? Subtract roughly 20 to 25 percent. Wind, cold, aggressive maneuvering, and the safety buffer your drone reserves to actually return home all chip away at the spec-sheet number.
A real-world rule of thumb: advertised flight time minus 8 minutes equals your usable creative window. Plan accordingly. Carry two batteries minimum. Three if you're shooting a paid gig.
Step 4: Don't Ignore the Boring Stuff (Transmission and Wind Resistance)
Nobody buys a drone because of its transmission protocol. But you will absolutely return one because of it. A weak signal at 1,500 feet over a lake is the fastest way to feel your heart drop into your stomach.
Look for dual-band 2.4 GHz and 5.8 GHz transmission, a wind resistance rating of at least Level 5 (24 to 31 mph), and obstacle avoidance on at least the forward and downward axes.
Step 5: Budget Honestly (Hidden Costs Are Real)
The sticker price is the appetizer. Here's the real menu:
- Extra batteries: $90 to $180 each (you need at least two)
- ND filter set: $50 to $120
- Carrying case: $40 to $90
- MicroSD cards (V30 or faster): $25 to $60
- Care/insurance plan: $80 to $300 per year
- FAA Part 107 (if commercial): $175 plus study time
The Five-Point Pre-Flight Checklist (Save This)
- Confirm GPS lock (minimum 12 satellites)
- Set RTH altitude above the tallest local obstacle
- Check battery temperature (cold batteries die fast)
- Verify SD card is inserted and formatted
- Scan the sky for birds, planes, and other drones
The Bottom Line
The best camera drone is not the one with the most impressive spec sheet. It is the one you actually want to grab on a Saturday morning, the one light enough to throw in a backpack, capable enough to capture the shot you imagined, and reliable enough to come home every time.
Match the tool to the mission. Spend the money on sensor size, not megapixels. Carry more batteries than you think you need. And for the love of every ridge you have ever flown over, check your return-to-home altitude.
Now go make something worth watching.
Key Takeaways
- Choosing the right how to choose a camera drone means matching capacity and output ports to your actual devices
- Always check actual watt-hours (Wh), not just watts — runtime depends on Wh, not peak output
- Also covers: best drone for beginners
- Also covers: drone buying guide
- Also covers: what to look for in a drone
- Compare price-per-Wh across models to find the best value for your budget